A crew on a metro viaduct job lost half a shift because nobody noticed the holder pocket on their rock bucket had gone oval, and three new bullet teeth went downhole in one morning. The driller blamed the teeth, but the teeth were fine; the pocket was not.
That is why rotary drilling bit maintenance and replacement matter more than the catalog price of any tooth. Selection gets the rig into the ground, and our guide to rotary drilling bit selection by ground condition covers that side. Maintenance decides how long the tool stays there. This guide gives you a unified schedule, replacement triggers by tool family, and a safe changeout procedure.
If you want a maintenance plan matched to your fleet, send us your rig list and tool inventory. We will return a rotary drilling bit maintenance schedule and a spares list for the season. Request a fleet maintenance plan.
What Rotary Drilling Bit Maintenance Actually Covers

Rotary drilling bit maintenance and replacement are preventive care for the cutting tools and the tool string that connects them to the rig. It covers buckets, augers, core barrels, and the rig-side items that affect them: the Kelly bar, rotary head, mast alignment, and hydraulic system.
The goal is not to keep the teeth shiny; it is to keep the load path correct. When teeth wear unevenly, the holder pocket loosens, or the mast drifts off vertical, the tool string loads sideways, and that causes vibration, heat, and accelerated wear on every part above the cutting edge. For a broader look at selection logic across types of rotary drilling bits, see our rotary drilling bit selection guide.
For the basic taxonomy of these tools, see our guide to the types of rotary drilling bits. The rest of this article focuses on how to keep each one running.
The Daily, Weekly, and Monthly Maintenance Schedule
A good rotary drilling bit maintenance and replacement program starts with a foundation drilling tool inspection schedule that separates inspection from repair. Inspection is cheap, but repair is expensive, and the table below shows the tasks that belong at each frequency.
| Frequency | Bucket | Auger | Core Barrel | Rig Side |
|---|---|---|---|---|
| Daily | Check tooth tips and retainers. Clean body and gates. | Check flight edges and tooth rotation. Remove spoil. | Check ring teeth and waterway clearance. Clean barrel. | Check hydraulic leaks, mast verticality, and ROP/torque trends. |
| Weekly | Inspect holder pockets and welds. Check cutting edge hardfacing. | Inspect hardfacing on flights. Check holder pockets and grease points. | Inspect cutting ring welds and holder alignment. Check roller bit seals. | Grease Kelly bar pads and rotary head. Check oil level. |
| Monthly | Measure cutting ring geometry. Review spares. | Check flight pitch and weld cracks. Review spares. | Check ring flatness and wear sleeve clearance. Review spares. | Service hydraulic oil and filters per hour. Review maintenance log. |
Daily checks take ten minutes if the crew is disciplined, and the payoff is catching a chipped tooth before it damages the holder or barrel wall. A sudden rise in vibration or torque on a clean tool also tells the operator the formation is harder than expected, which is a signal to pull early and inspect.
Weekly checks focus on the parts that hold the teeth, because holder pockets wear before the tooth shank does. A loose pocket lets the tooth rock; that rocking pounds the retainer and adapter until something breaks, so replace any holder where a new tooth rocks visibly.
Monthly checks are where you measure geometry, because cutting rings on buckets and core barrels must stay flat and concentric. A distorted ring loads some teeth harder than others; those teeth wear faster, and the ring distorts more until the monthly measurement catches it and breaks the cycle.
Replacement Triggers: When to Replace Drilling Teeth and Bits

The right time to replace a tooth is before it damages the holder or the tool body. The table below gives field-reported drilling bit wear limits and replacement triggers by tool family, covering drilling bucket teeth replacement, auger teeth maintenance, core barrel teeth replacement, and rig-side signals.
| Tool Family | Replace When | Delayed Consequence |
|---|---|---|
| Bucket bullet teeth | Carbide tip wear reaches ~5 mm, or the wear indicator is visible, or the body is chipped. | An exposed adapter damages the holder pocket and cuts more slowly. |
| Auger teeth | Carbide erosion reaches ~30%, tips are polished, or rotation stops. | Skidding tooth overheats and cracks the holder. |
| Core barrel teeth | 5 mm tip wear or 30% erosion, plus chipped or polished tips, or holder oval. | The ring loads unevenly, and the welds crack. |
| Roller bits | Bearing play, seal leak, cone lock, or insert fracture. | Cone loss downhole and barrel recovery. |
| Rig side | Torque spike, vibration, ROP collapse, or excessive heat. | Tool and rig damage, bent Kelly bar, mast fatigue. |
For bucket teeth, the 5 mm wear limit is the rule of thumb. The full tooth selection and wear discussion is in our drilling bucket teeth selection guide, and the key point is that the limit protects the holder and adapter behind the tip.
Auger teeth fail differently because they rotate as they cut, so a polished tip or seized shank means the tooth is not turning freely. A locked tooth scrapes instead of cutting, heat builds up and cracks the carbide, and the damage reaches the holder if you wait too long.
Core barrel teeth combine both failure modes. The outer ring teeth take the highest load because they cut the borehole perimeter, so check them first. If the holder pocket is oval, the tooth will rock even when new, and that is the most common reason for repeat tooth loss on a core barrel ring.
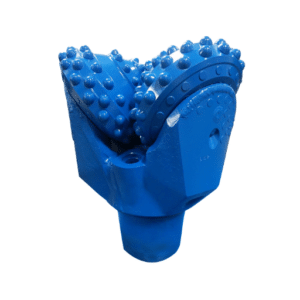
Roller bits are assemblies, not single teeth, and the bullet teeth versus roller bit trade-off is a selection question as much as a maintenance one. Replace them when you feel bearing play, see grease or mud leaking past a seal, or find a locked cone. A cone that stops rolling will skid and wear inserts unevenly. In the worst case, it detaches and goes downhole. Ranking Bit has a practical bit change guide for DTH, tri-cone, and PDC tools, though their scope is not foundation drilling. For more details, see our article on auger teeth types.
Holders, Pockets, and Hardfacing Are Part of the Job
A new tooth in a worn holder is a waste of money because the holder pocket is the interface between the tooth and the tool body. If the pocket is oval, the tooth rocks, the retainer fails, and the tooth falls; the field rule is to replace any holder where a new tooth rocks by hand.
Hardfacing protects the high-wear surfaces. On augers, the flight edges and wear strips need hardfacing; on buckets, the cutting edges and leading faces of the bottom plate take the same treatment; and on core barrels, the cutting ring body and the waterway walls need protection. Inspect hardfacing monthly because chips and cracks in the deposit expose the base metal to abrasive wear.
The Kelly bar and rotary head also belong in the maintenance loop. Worn Kelly bar pads let the bar wobble, and that wobble reaches the tool and increases vibration. A rotary head that is out of alignment puts side load on the tool string. Everstar Machinery covers rig-level rotary head, Kelly bar, and hydraulic maintenance in their rotary drilling rig maintenance guide.
Mast verticality matters more than most crews realize. Supplier-reported guidance suggests keeping mast deviation below 0.5% of hole depth; a tilted mast loads the tool string off-center, wears one side of the cutting ring, and makes the holder pocket wear unevenly. Check verticality at the start of each shift and after any ground settlement or rig repositioning. If you need a detailed comparison, please read our article on Core Barrel Teeth.
Drilling Teeth Changeout Procedure for Foundation Drilling Tools
Lockout/tagout comes first in any rotary drilling bit maintenance and replacement changeout, because no one touches the rotary head or the tool string until the power is isolated, the controls are tagged, and the drill string is supported by the right means. The drilling teeth changeout procedure below applies to buckets, augers, and core barrels.
For bucket and auger tooth changeout, follow this sequence:
- Secure the string. Support the bucket or auger so it cannot rotate.
- Remove the worn tooth. Use the correct drift and hammer, not a sledgehammer on the shank.
- Clean the holder bore. Remove mud, spoil, and any broken retainer pieces.
- Check the pocket. If the new tooth rocks, replace the holder before seating the tooth.
- Seat the new tooth. Use the correct retainer or clip. Make sure it rotates freely on auger teeth.
- Run a low-speed test. Check for vibration, noise, and uneven rotation before drilling.
Core barrel ring tooth and holder changeout needs more care because the cutting ring is a welded assembly. Support the ring on blocks before striking anything, check the weld zone for cracks after removing a holder, and realign the holder to the ring centerline before welding it in place. A holder that points inward or outward loads the tooth incorrectly and causes rapid failure.
Roller bit changeout uses different tools. You will need a bit breaker, chain tongs, thread cleaning tools, and the correct thread compound. CA Drillers compares percussive and rotary drilling methods and notes that rotary bits should be greased at changeout and matched to the material.
After any changeout, run the first pull carefully, starting at low RPM, checking torque, and inspecting the new teeth or bit after the first few meters. A tooth that is not fully seated can damage the holder in minutes, and a roller bit with insufficient thread compound can seize on the next trip.
Building a Maintenance Log That Prevents Surprises

A maintenance log turns field observations into trends. Without it, every failure looks like a one-time event, but with it, you see that the same auger always loses holders on the left side, or that the bucket always hits its wear limit after 120 hours in abrasive clay.
Record these fields for every inspection and changeout:
- Date, rig ID, tool ID, tool type, and operating hours
- Formation drilled, tooth condition by position, and holder or pocket condition
- Changeout reason, ROP and torque at last pull, spares used, and mechanic name
A maintenance lead named Elena tracked a core barrel on a highway job and found the outer ring teeth wearing twice as fast as the inner teeth. The log showed the pattern started after a mast realignment; once the alignment was corrected, tooth life doubled on the next barrel, and the data paid for the repair in the first month.
Review the log weekly for accelerating wear, repeat holder failures, and mast drift. The same log justifies spares orders: if you know a bucket needs a full set every 140 hours in that formation, you can stock the right quantity before the job starts.
Spares Inventory Rule
The safe rule in any rotary drilling bit maintenance and replacement plan is one full changeout set per tool on site. That means one full set of teeth, plus the holders, clips, retainers, and wear sleeves that match that tool. Do not stop at teeth, because the holder is often the real shortage.
For a rig running buckets, augers, and core barrels, keep the following on the trailer or in the site container:
- One full set of teeth for each bucket, auger, and core barrel in use
- Spare holders or blocks for each tool, 20% above the tooth count
- Retainer clips, spring pins, lock rings, wear sleeves, and bushings
- Thread compound and anti-seize for roller bits and threaded adapters
- Grease cartridges matched to the rig grease points
- Hardfacing electrodes or welding rods for field repairs
Add seasonal surge stock for abrasive formations. Quartz-rich sand, weathered granite, and abrasive clay will consume teeth faster than average, especially when you are drilling with tools selected for hard rock. If the geotechnical report shows high quartz content, increase the tooth stock by 30% to 50% for the first month. For more on matching tools to hard rock, see our guide to the rotary drilling bit for hard rock. Adjust stock after the first real wear cycle.
Common Maintenance Mistakes That Cost Money
Small shortcuts create large bills in rotary drilling bit maintenance and replacement. The most common mistakes are easy to prevent once you know them.
Putting a new tooth in a worn holder is the most expensive mistake, because it saves ten minutes today and costs two changeouts next week. Always check the pocket first.
Ignoring mast tilt or barrel alignment is another silent killer: a tilted mast loads the tool eccentrically, the cutting ring wears on one side, the teeth wear unevenly, and the operator adds more crowd force to compensate.
Using the wrong grease or no thread compound is common on roller bits and threaded adapters; the threads gall, the bit seizes, and the next changeout requires heat or a trip to the shop. Use the compound specified by the manufacturer.
Skipping the post-changeout test run lets you drill with a loose tooth or an unseated roller bit. The first pull after a changeout should be slow and short. Inspect the tool before returning to full parameters.
Storing dirty tools accelerates corrosion and seizes moving parts, so clean the body, remove spoil from the flights and bucket, protect threads with caps or anti-seize, and store on timber blocks off the ground.
Rotary Drilling Rig Maintenance Checklist

Use this rotary drilling rig maintenance checklist as a pre-shift, post-shift, and changeout routine. Print it and laminate it for the rig.
Pre-shift:
- Check mast verticality and rig alignment.
- Inspect tool teeth for chips, wear, and missing retainers.
- Check hydraulic oil level and leaks.
- Verify grease points are charged.
Post-shift:
- Clean the tool body, flights, barrel, gates, and waterways.
- Check for cracked welds and damaged hardfacing.
- Record hours, formation, and any abnormal vibration or torque.
Weekly:
- Inspect holder pockets and replace any that are oval.
- Check hardfacing condition on cutting edges and flights.
- Grease Kelly bar pads and rotary head.
- Review maintenance log for trends.
Monthly:
- Measure cutting ring geometry and shell wear.
- Review spares inventory and reorder before stock runs out.
- Service hydraulic oil and filters per hour meter.
- Audit mast alignment and rotary head condition.
Changeout:
- Lock out and tag out the rig.
- Support the drill string.
- Clean the holder or thread and check pocket or thread condition.
- Seat the tooth or bit correctly and run a low-speed test.
Rotary Drilling Bit Maintenance and Replacement FAQ
How often should rotary drilling bits be inspected?
Inspect teeth and tool bodies at the start of every shift, check holder pockets and hardfacing weekly, and measure cutting geometry plus review maintenance logs monthly. In abrasive ground, shorten the intervals by 25% to 50%.
When should I replace drilling bucket teeth?
Replace drilling bucket teeth when carbide wear reaches about 5 mm, the wear indicator is visible, or the body is chipped. Replace the holder too if the pocket is oval or the tooth rocks by hand. Our drilling bucket teeth selection guide explains how to match tooth type to ground and duty grade.
What is the 5 mm wear limit for bullet teeth?
The 5 mm wear limit is a field-reported threshold for bucket bullet teeth. Once the carbide tip wears down by roughly 5 mm, the steel adapter behind the carbide starts taking load. The tooth cuts slower, vibrates more, and can damage the holder pocket. The limit is a proxy for protecting the whole tool string, not just the tooth.
How do I know if a holder needs replacement?
The best test is to insert a new tooth into the pocket and try to rock it by hand. If it moves visibly, the pocket is oval, and the holder must be replaced. Other signs include repeated tooth loss, a cracked retainer groove, or a damaged weld.
What is the standard drilling teeth changeout procedure?
The standard drilling teeth changeout procedure starts with lockout/tagout and support of the drill string. Remove the worn tooth with the correct drift, clean the holder bore, inspect the pocket for oval wear, seat the new tooth with the correct retainer, and run a low-speed test pull before returning to full parameters.
How should drilling tools be stored between projects?
Clean the tool thoroughly, remove all spoil and drilling fluid, and protect threaded connections with caps or anti-seize. Store on blocks in a dry area, rotate roller bits by hand every few weeks to keep bearings free, and lubricate grease points before storage and again before service return.
Conclusion
Rotary drilling bit maintenance and replacement are the multipliers on every selection decision. The right tooth in the wrong holder will fail twice as fast as expected. The right tool, run with a tilted mast, will wear on one side and cost a cutting ring. The right schedule, recorded in a clean log, turns guesswork into a plan.
This guide gives you a unified rotary drilling bit maintenance and replacement schedule across buckets, augers, and core barrels, plus replacement triggers and a drilling teeth changeout procedure. Use the rotary drilling rig maintenance checklist, keep the right spares, and review the log weekly. The crews that do this do not avoid wear. They choose the wear they can plan for.
If you want a maintenance schedule and spares list tailored to your fleet, send us your rig list and tool inventory. Changsha Mingyi Machinery Equipment Co., Ltd. will return a rotary drilling bit maintenance and replacement plan that matches your formation, your fleet, and your operating hours.