Making a hole in rock is a precise and difficult job that needs to combine the exact various tools and methods and safety precautions. It doesn’t matter if you are a builder doing a big construction or just a DIY fan looking after any improvement at home, knowing the main steps and equipment can lead to a high advantage in your work. This complete guide is going to guide you on the way through the absolutely necessary tools, various drilling methods, and professional tips which guarantee both accuracy and efficiency. You will not only get your desired results but also avoid overusing the tools and making fewer mistakes by being proficient in all these methods. This is your moment when you can fully dive into the world of knowledge and skills that are necessary for a rock-drilling-like-an-expert.
Understanding the Basics of Drilling Holes in Rocks
Types of Rocks Suitable for Drilling
The potential of a rock for drilling comes down largely to its composition, density, and structural integrity. Typically rocks can be divided into three main types—igneous, sedimentary, and metamorphic—each type having distinct difficulties and benefits in drilling.
Igneous Rocks:Igneous rocks like granite and basalt get their origin from the cooling and hardening of magma or lava. It over and done with that high density and longevity; they can be hardly drilled. Drilling in igneous rocks using ordinary tools is not possible; very hard diamonds are used for the purpose. Despite all of these, drilling for construction and mining takes place in igneous rocks due to their stability and hence strength.
Sedimentary Rocks:Sedimentary rocks for example limestone, sandstone, and shale are the result of sediments that get pushed together and become hard but they can still show a variety of hardness. Such rocks are generally smarter to drill than those of igneous nature, especially that constitute of softer minerals. Nevertheless, some types of rocks, for instance, quartz-rich sandstone, may show a higher resistivity that would demand the use of sophisticated techniques in order to get a precise drilling.
Metamorphic Rocks:Metamorphic rocks like marble and slate are formed by the conversion of other rock types due to high temperature and pressure. The drillability of the upper crustal rocks is influenced by the degree of their rock mass quality and the amount of bedding that they have. The high folding of rocks might be inherent so that it will be more likely to wiggle and split in an even way during the drilling process and so, there would be a need to change the approach and the selection of equipment.
In order to be able to select the right tools and ways for drilling, it is essential to be well aware of the particular properties of the rock that is going to be drilled. This is to achieve both high efficiency and durability in the running of. Knowledge of the geological features of the target material is a significant risk reducer and the best way to make drilling successful.
Choosing the Right Drill for the Job
Picking the perfect drill bit from the variety available must include consideration of a few key factors for instance material hardness, abrasiveness, and fracture tendencies. A very hard-hitting example is drilling with diamond-tipped drills which are the best in the field of the hardest materials because the diamonds they are made of wear-resistant and can be cut very accurately at all. Conversely, with tungsten carbide drills is the answer when it comes to the drill of the rocks that are not so hard and/or abrasive. Speaking about and focusing on the speed of rotation and bit type of the drill, it is a big part of the puzzle too, since the faster the softer rock or the harder one, the more controlled drilling will benefit only from the slower and slower process. The point is that the drill rig and bit types must be compatible, which means that the drill will be able to perform better, which will frequently be the case, and will be welcome.
Safety Precautions When Drilling
In order to protect workers and make the drilling operation go smoothly without any damage to equipment, it is very important to be very specific with safety measures and safety rules. Before starting to drill, the very first thing to do is making a very careful risk assessment where potential hazards like unstable ground, high-pressure zones, or equipment malfunctions will be identified. The use of the proper personal protective equipment (PPE) is a must and that includes helmets, safety glasses, gloves, and hearing protection to avoid any accidents and to be on the safe side when working near debris, noisy areas, and vibrating equipment.
It should be a regular practice to run through a checklist for equipment inspection, which should include among others a check for any signs of damage, alignment of elements together with the verification of the emergency shut-off mechanisms. Drill sites shall be allocated properly and the entry to them allowed only for people who have permission, so the possibility of somebody unintentionally stepping onto a dangerous area is lessened. In addition, everyone attending to the job should be well-trained, especially with regards to the capability of carrying loads, the torque adjustment, and the appropriate use of drilling equipment.
Releasing the information to the workers and conducting safety meetings every day to inform them of any changed emergency plans are some of the first. It is not an easy process, and if it is not done right, then there is no point in having done it at all. Regular checks made, it is, however, a case of either the drills or the driers themselves being the potential problem. It is very important to meet the requirements stated in the law, especially when environmental issues are involved. Therefore, businesses which are focused on good environmental practices will be compliant just by following the rules properly, without having to make any further effort. It should also be noted by the companies that regular monitoring of the working environment and communication between the staff of the different units would help avoid accidents by enabling them to correct the problem before it leads to that. Practicing this set again and again, the whole thing will feel more like a real job than anything else.
Essential Tools for Drilling a Hole in Rock
Using the Correct Drill Press
When drilling into a rock, the choice of the accurate drill press becomes very important for getting the job done precisely and effectively. Normally, a heavy-duty drill press that is made for industrial use is the favorite one when the rock is very hard because these tools have the power and strength required. The big features to select are the power of the motor that is expressed in horsepower and the rotational speed of the spindle of the drill press, which must have various settings for the different types of rocks. Also, a rigid structure and firm stand are indispensable to reduce shaking, thereby providing the user an easier time when it comes to controlling and being both precise and accurate in the work with the drill press.
It is common for up-to-date drilling machines to have sophisticated tools, like digital speed displays, depth stop controls, and laser guides, that improve their accuracy and usability. It even gets better with the use of hydraulic feed systems or power-feed mechanisms which tend to reduce the manual labor and keep the drilling pressure at a constant level. It is very important to team up the right drill press with high-performance, carbide-tipped drill bits for rock as it is the only way to get through the hardest surfaces. The evaluation of the needs of the project and the specifications of the equipment will result in the drill press that, once bought, will bring out the best performance and highest safety.
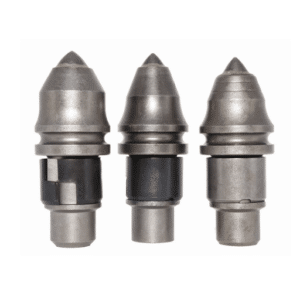
Best Drill Bits for Rock Drilling
In terms of rock drilling, it is of utmost importance to choose the right drill bits so as to get the job done with precision and quickness. Generally, the best selections for this purpose are carbide-tipped drill bits and diamond-coated drill bits as both materials have remarkable hardness and wear resistance. Carbide-tipped drill bits are the ones that are mostly being used in intense and continuous drilling operations because they can be heated up to very high levels and at the same time be able to confront abrasive materials by maintaining their structural appearance. Conversely, diamond-coated drill bits are the biggest hit among the extremely hard substrates like granite or quartz in which the cutting power and lifespan need to be top-notch.
Furthermore, the geometry, as well as the design, of the drill bit will give a lot of benefits in making the drill performance optimum. For example, the split-point drill bits tend to reduce the walking as well as guarantee the fruition of the rock surface that is correct. Additionally, the spiraled flutes with deep grooves apart from facilitating fast removal of the debris during the drilling process and thus reducing the friction also prevent clogging. The selection of the characteristics of the rock to be drilled and the choice of the drill bit material and design that correspond to each other are the main factors to get the highest possible performance.
Exploring Dremel Tools for Engraving and Drilling
Dremel tools are very versatile and precise so they can be used for a variety of tasks like engraving and drilling. The features of the tools are so precise that they can be controlled even at a very high speed, so there are no limits to the performance that can be achieved along the way. The tools thus are developed in a way that they can operate very easily on different materials, whether it might be wood, metal, glass, or ceramics. Diamond-tipped bits are the most recommended for engraving projects as their hardness and precision bring about accurate and detailed patterns and even designs in a few touches. When talking about drilling, the user-friendly process is further ensured by the provision of tools including bits that are made of either HSS or carbide with the former capable of grinding them to dust. Besides that, Dremel has already come up with new designs that keep users comfortable even when they are using tools for several hours. Proper choice of accessories and material evaluation are par the course for the best engraving results on the one hand and best hole precision on the other.
Step-by-Step Guide on How to Drill Holes in Rocks
Preparation of the Rock Surface
The key to perfection and prevention of both tool breakages and material damages lies in proper preparation of the rock surface. Initially, examine the rock for any cracks, uneven textures, or defects which might affect the drilling. The use of a clean, free-of-lint cloth will get rid of any dirt, dust, or other elements from the surface. If the rock happens to be very greasy or oily, it can be cleaned with a mild detergent solution, then rinsed very well, and finally let to dry before proceeding. For harder stones, the drilling area can be identified by using a carbide-tipped scribe or a permanent marker to avoid mismatching the tool place with the desired cutting point. The rock that is firmly fixed in a clamp, vise, or any tool having rubber pads will add more improvement to the process by eliminating vibration during the drilling which will ensure safety and precision.
Marking Your Drill Holes
Drill holes accurately is an important part of the drilling process and it is also essential if precision and error are to be kept to a minimum. hints measuring and locating the hole sites with high precision measuring tools that are such as calipers and digital rulers to get the exact dimensions. When the locations are known, one can apply the scribe with a carbide tip or a good bright permanent marker to mark the rock’s surface which are durable and yet clear. When working with very dense or textured rocks, it is wise to use a center punch to create little holes at the marking points; the guide created will prevent the drill bit from going in the wrong direction and will also decrease the friction and thus the risk of the drill bit losing its grip on the material, hence causing dangerous working conditions to be counteracted. Surface preparation that is stable and hole marking that is accurate is the right combination needed to effectuate a clear and accurate result while at the same time the original rock’s structure remaining intact.
Drilling Techniques for Different Rock Types
It is necessary to adjust the drilling methods by taking into consideration the specific properties of the stone that is being drilled, because the variation in hardness, density, and internal structure has a direct impact on the process and result. For instance, soft sedimentary rocks like sandstone or limestone could be drilled sufficiently by the high-speed rotary type of drill with the carbide-tipped bits. Due to the low hardness of such materials, they could be penetrated with a high speed that would cause minimal wear and tear to the equipment.
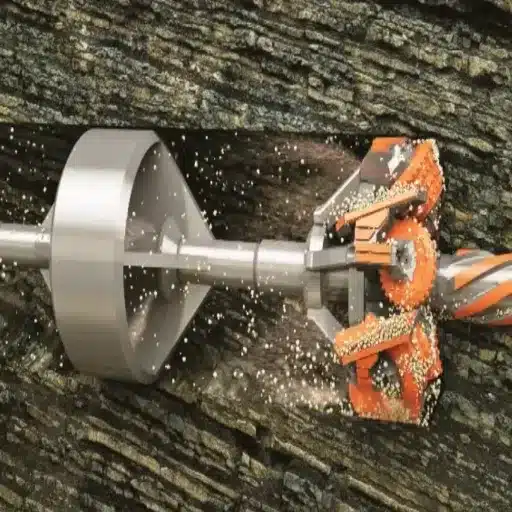
On the other hand, the drilling of igneous rocks such as granite and basalt would require better techniques because of their high hardness and density. Drilling with diamond bits is one of the most effective methods for working on such types of rock because the bits can prevent the intense abrasion on the bits caused by the harder mineral composition. Curing the drill bit cutting temperature with water and the suppression of dust during drilling are the necessity to avoid the overheating, and to prolong the life of the tools.
Metamorphic rocks add a new difficulty to the task, such as marble and slate. Their structure, which usually comprises foliations or weak planes, can reflect unpredictability in the breaking of rock when drilling through them. Slower rotation with less pressure used for every drilling stroke is the good way to get exact results and decreased cracking along these planes and hence reduces the risk factor. The rock hardness does not change the fact that excessive force is the main evil and has to be avoided to prevent the damage of rock and drill rig.
Common Challenges When Drilling Holes in Rocks
Handling More Complex Rock Types
When it comes to drilling into the harder rock types like granite or basalt, it is crucial to use the right tools and techniques for handling their density and hardness efficiently. Among these tools, diamond-tipped drill bits are the most durable and thus the most strongly recommended as they can endure the generated drift and heat caused by the drilling. Besides, a water-cooling system becomes an indispensable factor in drilling as it aids in the heat dissipation, reduces the wear on the drill bit, and also hinders the formation of the dust that might come in the way of visibility and affect worker safety.
Correctly adjusting the speed of drilling is of utmost importance during the process of working on tougher rocks. The use of low rotary forces along with firm and uniform pressure provide a more controlled way to do the penetration and at the same time reduce the chances of the drilling equipment going through the overheating process. Moreover, in some cases, the hard rocks might already have pre-existing microfractures or structural weaknesses which can lead to unintended cracking or splitting. To prevent this, the first thing one needs to do is to map the structural characteristics of the rock prior to drilling, and a choice can be made out of a few techniques including ground-penetrating radar and ultrasonic scanning to identify weak spots that might pose a threat.
The selection of lubricant is likewise a crucial factor in having an effortless experience in drilling. Current artificial lubricants can minimize friction and also increase the life of the drill bit without losing any performance. In general, the use of sophisticated tools, well-controlled methods, and regular equipment servicing guarantee an effective and precise work on tough rock formations wherein drilling is also included.
Preventing Cracks and Breaks
It is the latest development in the industry, and while using it, the experts have concluded that an increased incidence of broken bits and cracked drill heads was noticed. To reduce such occurrences by more than 50%, it is now considered a necessity to carry out beforehand the identification of the material characteristics as well as the structure integrity. By using modern imaging methods like ultrasonic testing and X-ray diffraction, it is possible to get a clear picture of the fractures inside the material or any weak spots present. Besides that, utilizing the right speeds during drilling and keeping the pressure within a reasonable limit will also prevent the material from undergoing excessive tension that leads to the growth of stress. The alignment of the drill bit and preventing the material from having sharp turns are other ways through which the occurrence of damage can be minimized. Furthermore, one of the significant factors that drillers should look at is to inspect and replace worn bits regularly as this will eliminate one of the root causes for the emergence of the microfractures which is the use of dull or damaged tools. Thus, all these measures, together with the use of systematically designed equipment, ensure the material strength all through the drilling process.
What to Do When the Drill Bit Gets Stuck
When a drill bit gets stuck, it becomes necessary to quickly respond so that no more damage is done to the material and equipment. First of all, cease the application of force on the tool as the set of the drill itself can be the reason for the drill bit to get stuck and the moment the force is removed, it can lead to the breaking of the drill bit or to the damage of the workpiece. Determine the location of the drill bit, considering if it is jammed due to dirt, lack of alignment, or high friction.
To extract the bit, run the drill in reverse at a low speed because this method can usually wiggle the bit loose without adding more stress. Should reversing fail to achieve the intended result, try using a lubricant such as cutting oil to lessen the friction and thus make it easier to move the stuck bit. In the case that the stuck bit is surrounded by debris or the material is compacted, take advantage of a very narrow tool or compressed air to gently remove the blockages.
If after all these attempts are unsuccessful the drill bit is still stuck, you may then have to break down the area surrounding the borehole or use a special tool to take the bit out. In all cases protecting the equipment is a priority and following with due safety measures is a must while both user and machine safety are ensured throughout the process.
Advanced Techniques for Drilling in Specific Rock Types
Tips and Best Practices for Drilling in Limestone
Limestone is a tricky drilling material because of its unique features such as its being comparatively softer than other rocks and the tendency for it to crack easily. To me, enabled selection of the right drilling equipment is key. One will get faster penetration and reduced wear or breakage risk by employing drill bits exclusively for soft to medium rock such as the carbide or the diamond-tipped bits. Moreover, the focus on the drill’s rotational speed and feed pressure is crucial; excessively high speed or pressure can cause the limestone to overheat or can result in hairline fractures, the latter potentially making the hole structurally vulnerable to lateral forces.
According to my own experience, the drilling process can be greatly improved by providing a continuous and controlled cooling and lubrication. Use of a constant supply of water or drilling mud not only reduces the bit temperature but also helps to get rid of the detritus from the borehole thus (i.e., which in turn) increases the productivity and extends the life of the equipment. Moreover, keeping the cuttings cleaned out at the regular intervals will prevent them from getting lodged, a problem often faced when working with limestone.
In the event of handling grandiose works or when the limestone layers are much too compacted, the percussion or down-the-hole (DTH) hammering could be the answer. These two techniques are very forceful and they are used with rotary tools to smash the toughest parts and, at the same time, maintain control and precision. One can realize the best results by following these practices and controlling the tool’s main parts by checking out the wear condition at regular intervals so, on the other hand, the risks that come along with limestone drilling can be reduced up to a minimal level or even eliminated completely.
Engraving Designs in Granite and Marble
The operation of cutting and shaping stones to make artworks on granite and marble is thing that need a lot of patience and skill. To my knowledge and from what I have read, the most useful present-day way is to mix the mechanical approach and the use of the new type of laser equipment. The very common hand tools like chisels and hammers are fast taking the machine way by the help very precise Computer Numerical Control(CNC) cutters and laser engravers hence offering much more speed and a lot of precision.
For granite, it is mainly the diamond-tipped tools that are still in use due to the hardness of this material that ensures a fine cut. Softer marble however makes it easier to have more intricate patterns but this is still only possible with the right tools to prevent fractures and chipping.
When it is about this kind of projects, the main weapon is readiness, of which the first phase is usually the crafting of the design being done digitally most of the time with the CAD (computer-aided design) software, which provides the best option for thorough detailing and accuracy. After that, the design gets to the stone surface by the virtue of another path, either processes like cloning with the help of guidelines or by the machinery doing a direct engraving that is automated. Using laser engraving is a big part of the choice here since it offers full control over the image precision and is mostly used for detailed artwork or lettering. However, the very high heat produced by lasers could at times change the stone’s surface look, so the equipment should be adjusted to work with the specific stone type.
Preserving the beauty of the granite and marble while retaining the design’s integrity calls for expertise in the characteristics of every material. Granite can withstand the weather hence it is chosen for outdoor engravings such as memorials and signage, while marble’s smoother feature is more suitable for fine indoor jobs like plaques or decorative art. Engraved designs can continue to be vivid as long as they are maintained through periodic cleaning with products that are not abrasive. Exceptional results that blend durability with artistry can be produced by fusing conventional craftsmanship and state-of-the-art technology.
Innovative Techniques for Unique Rock Formations
In creating unique rock formations, my reliance is on a vast geological knowledge and modern techniques not only in giving natural stones their shapes but also in manipulating them. The most important among the methods, we use is the one that harnesses the power of a precision laser cutting and engraving machine. With the help of lasers having high power, it becomes possible for me to do very detailed designs on different kinds of stone and get intricate shapes including those made from basalt, limestone, and slate. By this method, not only can one have the exactness of design but also the near-to-zero-harmness of the rock substrate to make it still have its integrity and beauty. Moreover, the appearance of a rock formation and its components is first done as a presentable model through a 3D computer program, as this is very helpful during the initial phase and will save time and money.
One more innovative approach I apply is the cutting hydro-abrasive technique. This technique works by a high-pressure water jet blended with abrasive particles, so that it can cut stones in an incredibly accurate way even though they are the hardest stones. It is extremely useful when it comes to making smooth curves or complicated shapes that cannot be made with the help of conventional tools. Another aspect worth mentioning is the fact that one of the priorities in my work is to include eco-friendly sealants and protective coatings. These coatings not only protect the rock formations but at the same time they make it possible for the constructions to be resistant to environmental erosion and weathering.
Last but not least, it’s super important for me to combine the old methods with the new ones in the most engaging way possible. The example is the one with the pneumatic tools being employed in a very intricate carving process so I can still reproduce the way it had been originally made or either connect it with the elements of nature if it had been done so to make it more appealing aesthetically while not compromising on the quality by any means. The right choice of layers, textures, and polishing makes the pieces look like they were made by the natural forces of the Earth, and as such, they gain the feature of timeless beauty. The combination of these techniques is proof enough that what I create with my work is no less than one-of-a-kind and the only thing that it has in common with my other works is my signature.
Reference Sources
-
Lesson 5.4: Drilling – Penn State University
Discusses drilling techniques, including creating holes for rock bolts and degassing coal seams. -
Rock Drill – Sonoma State University
Provides details on the tools and steps required for drilling holes in rocks, including marking and water pressurization. -
How is Core Obtained? – University of Kentucky
Explains the process of drilling and obtaining core samples, including the use of drill strings and pipes.
Frequently Asked Questions (FAQs)
Would you like to drill a pilot hole in the rock before using a diamond bit?
Certainly, having a small pilot hole in your slab is the solution to handling the forthcoming drilling process and the respective tools, and it eliminates wandering on the rock. In drilling the pilot hole use a masonry bit or a carbide-tipped masonry bit at a slow drill speed and keep the drill in one place. While using a drilling machine or a mobile drilling machine the situation is more controlled and the steadiness of drill speed and pressure on the drill can be maintained. It is always advisable to wear eyeglasses for safety, because the rock dust and chips could be a risk to the eyes and it is also good to have a breeze off the dust in between the passes together with a companion hole. In case you have to drill bigger holes in the future, the bit size should be gradually increased instead of using a single large burr or core bit and increased progressively.
How much pressure is optimal during drilling with an SDS hammer or rotary hammer?
When operating an SDS drill or SDS hammer, steady pressure is to be applied. However, it is important to make sure that the pressure is not excessive, as this can make the tool bind and heat up the bit too much. Hence, it is recommended that you let the rotary hammer or hammer drill take the lead—this is because excessive force can cause the rock to fissure, leading to the breaking of diamond drill bits or carbide tips. Cooling the drill by intermittent drilling is another means of creating a manageable task and keep the whole operation cool. Moreover, intervals of rests would allow for the clearing of the cuttings and for the running of water or water cooling to be efficient and reduce the heat and friction on the bit. Sitting idle with the bit in the hole and then forth and back the hole can be used for withdrawing the debris and checking the progress at the bottom of the rock. A proper tapping force also minimizes pops and preserves the life of the bit.
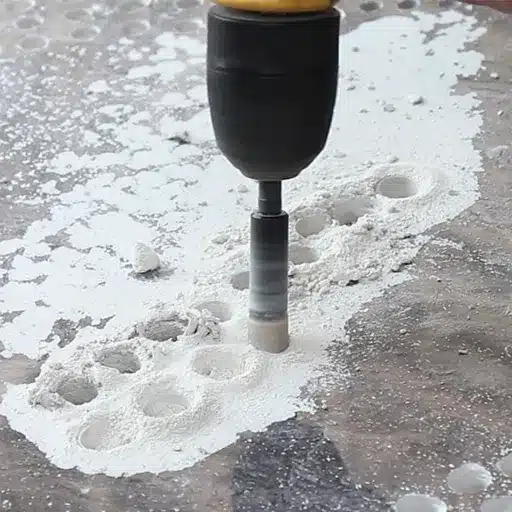
What is the point in using water or immersing the work when drilling holes then?
Applying water in the drilling area or soaking the area could be a huge help in lubricating and cooling the diamond bit, thus, reducing the sticking and the possibility of overheating or failure of the diamond bit. In the case of the diamond core drills, water cooling is very necessary and in cases where the drilling is deep and the heat build-up is high. One option is to allow the water to run from a hose or set up a drip system for handheld drilling rigs, and if possible, place a bucket underneath to collect slurry and rock dust. The foremost advantage of keeping the area wet is a reduction in the amount of airborne rock dust and the corresponding inhalation hazard. With the advanced safety and health measures in place, even for tile or jasper and soft materials, a steady flow of water eliminates the chance of chipping around the hole and at the same time preserves the perfect finish.
When you have to drill a deep hole, how do you handle rock fracture and borehole bottom-of-hole problems?
If you want to prevent fractures and make sure the hole is deep enough without collapsing, drill in successive stages and remove rock dust frequently, and simultaneously provide the cooling of water to dissipate the stress caused by heat and friction. Monitor the diameter and eliminate small chips by means of compressed air or by pulsing the drill so the bottom of the rock is left intact and does not seal the bit. In case of deep boring it is advised to go with diamond core drill bits that are a bit larger than the final fastener so the resin or epoxy adhesive can be used in case of necessity. If you observe cracking or a scratch indicating a weak point, then you should immediately cease the work and rethink whether to switch the bit or to lower the rpm and pressure. Properly performed technique results in a hole that does not have a sharp edge and is able to take anchors or resin fillers is obtained and thus a clean hole is prepared.
Would you like to drill through the tiles or thin stones without cracking the surface?
Use a dremel drill with a diamond core bit or diamond hole saw at low speed and with light, steady hand to reduce the chance of chips or cracks when working with tile or thin stone. Create-a pilot scratch or a small pilot hole, and, most importantly, keep straying area wet to reduce possible blowout due to heating and friction. Hold-the stone in place via a jig or firmly and have a supporting material to catch the exit end of the stone, this way the hole will be a bit neater when the drill runs through. If the tile is very tight under a protective grout and the cement is too close to damage, keep them away from qurry, and you can use a dremel-type tool while avoiding the hammer drill to minimize the impact. Smooth out the hole if necessary with a dremel bit and eraser burr, and remove the dust before applying the epoxy or adhesive.
How many hours do you spend, and what are the factors that impact a diamond core drill to do it really slowly when drilling hard rocks?
Drilling through very hard rocks can actually take a long time because of the hardness and the need to run the drill at a slow pace to protect the diamond segments and reduce friction. Elements to take into account are bit diameter in mm, the hardness of the material (granite, jasper, or quartz), poor water cooling, and wrong rpm or too much pressure on the drill. The proper diamond core drill with the swapping out of worn diamond drill bits per bit life helps cutting efficiency to be maintained. Do not let the drill get overheated, provide it with a continuous supply of water, and also have a break so as to remove the rock dust to keep the cutting surface sharp. If the progress is still slow, then a different bit geometry can be tried or a bit of higher quality purchased from a reputable brand like Bosch or Dewalt-rated cores.