Pilot bits are a crucial component of the drilling process as far as criterion and efficacy are concerned and thus are needed. Even small, these tools are the force to reckon with because their main function is to direct and control the regular drilling course. They are the guarantee for high precision, accurateness, and at the same, reduce waste of materials and other errors. Pilot bits can be used in any kind of industry whether it is wood, metal, and masonry too but knowing exactly what these tools do and their proper use can be of great help in every sector of your very own work. Hence, in this article you will find the principal reason why pilot bits exist, how they work, and their best application areas. In the end, you’ll actually be able to understand, no matter how difficult, the contribution of the pilot bits for enabling the drilling process to be done easily and reliably, regardless of the material or the volume of the project.
What are Pilot Bits and Their Role in Drilling?
Brief Explanation and Summary of the Utilization of Pilot Bits
Pilot bits are a particular kind of drill bits that are made to cut a straight small hole before the main drilling procedure. This is extremely useful in marking the exact point previously marked on the surface also with the help of the drill bit’s pilot hole, very importantly, it is very easy to hold the drill straight and not at an angle. Needless to say, pilot holes due to its small bore and large diameter compared to the drill bit used, so the larger part of the heavy boring is done through the latter. The drilling time is thus significantly reduced, and the direction of the drill is not lost by vibration. The bit from a point on the side therefore has no tendency to slip off, and the hole is made straight and clean, which is what is required when a large drill is to follow. The industrial application of pilot bits threw a light part of the wood industry for a period of electronics which extended the application to various other materials as wood is still one of the most common taken into account. Another reason for the electronic like the industry to go for pilot bits was the accurate hole and reduced bore/repeatable hole of the electronics industry was the introduction of the earlier ones without which it would have been impossible to make the hole finishing without the drill traveling its diameter off.
Importance of Pilot Holes in Various Drilling Applications
The importance of pilot holes in ensuring accuracy and safety cannot be overemphasized as they are indispensable in a plethora of drilling applications. Thanks to the pilot holes’ small guide hole that was pre-drilled, they will be very helpful in preventing materials from splitting thus a very good solution for woodworking projects that are delicate and involve materials such as hardwood or plywood. Furthermore, since the pilot holes greatly minimize resistance, this results in tiresome drilling situations which can sometimes lead to the carbide being exposed through breaking, friction heat, and jamming, etc. This consequently not only helps in the durability of the tool but also in the accuracy of the final job.
One more benefit of using a pilot hole is that it ensures a tighter screw fit. If screws are driven into material without a pilot hole then the result will be the screws are in a different line or they are stripping the threads, causing instability to the project as a whole. This is the reason why this method is extremely critical in the areas of construction and metalworking especially when there is no other way but to preserve both precision and strength at very high levels.
Pilot holes are a must-have for someone who deals with tougher materials such as metals or heavy-duty materials, as they help keep the drill bit in place at the drilling spot and prevent it from going astray. This point is very vital in the industrial field where production and safety standards are directly affected by the quality and uniformity of the products.
Types of Pilot Drill Bits Available
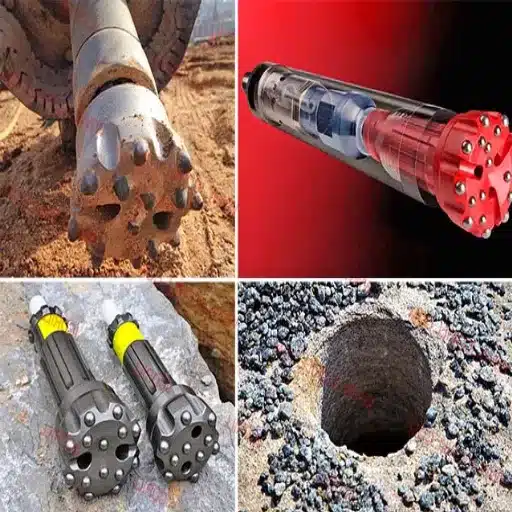
It is important to know about the different types of pilot drill bits when selecting one, to make sure about the efficiency and accuracy of the process. The most widely used types are as follows:
🔹 Twist Drill Bits
These bits cut wide tapers and hence are very useful for making larger holes. Also, they are the favorite of most users for both wood and metal drilling work at the speed of light.
🔹 Brad Point Drill Bits
Made for woodworking, those bits are quite distinctive because a knife is featured at the center to get the cutting started, and that is why the precision and the derived slipperiness are cut down.
🔹 Split Point Drill Bits
Split-Point Drill Bits are specially created for the drilling of metals and other rigid materials, where they come with an exceptional split-tip design to guarantee the immediate and less sliding on the surface cutting processes.
🔹 Step Drill Bits
These Taper drill bits are ideal for applications where numerous hole diameters are necessary. Step drill bits gradually enlarge holes by consistant increments, thus, outputting smoother results compared to a hole saw.
🔹 Cobalt Drill Bits
Moreover, the higher the cobalt content, the harder the material, hence, the increased temperature resistance, which can only be found in these perfectly designed and high-quality cobalt bits that are often rated at 8-10% cobalt.
The performance of the suitable starter drill bit is greatly determined by the condition of your material and the level of accuracy that is needed for the job, and this guarantees a smooth and efficient drilling process.
Key Features and Specifications of Pilot Drill Bits

Understanding Shank Sizes and Types
When it comes to the sizes and types of shanks, the wide range of items available for selection should be considered as they directly impact the compatibility of a drill bit with a specific drill. The most used shank types are those like straight shank that is the best for general drilling and the hex shank that is the one when quick and safe bit changes are desired, often with impact drivers. Drills that are made with reduced shank type bits can also be used, the benefit being the usage of drills with smaller chucks and still being able to work with larger bits. In addition, unique options like SDS (Slotted Drive System) shanks are also made to meet the needs of tough grinding applications such as brick or concrete drilling. In such applications, UNS may only be able to provide good retention and bad slack. However, with one of these shanks, not much side movement, if any, is likely to be observed and a lot more torque can be utilized. This is because each shank style is meant to cover a specific drilling service, hence it is efficient and a tool that has been selected will have its performance improved as a result. Through the comprehension of these variations, the users will be able to choose rightly the kinds of shanks that will fit their projects best.
Material Considerations: Metal, Aluminum, and Stainless Steel
Choosing the right material for a project among metal, aluminum, and stainless steel requires knowing their characteristics and where they are used. Broadly, metals are robust and long-lasting, so they are used in heavy-duty tasks and for building structures. Aluminum stands out for being light-weighted and non-corrosive, thus making it the best option where there is a need for weight savings such as the aerospace or automotive industries. Stainless steel is said to be very strong and that it does not get rusty beside that it is having a very nice finish, and these are the reasons why it is the most common metal for both construction and decorative uses. All of this said, once the advantages and disadvantages of each material have been singled out, the experts can go for the best mix that satisfies the exact conditions and requirements of their projects.
Different Bit Sets and Their Applications
Drill bit sets are considered must-have tools in the world of every sector, where they give performance excellence in tasks requiring preciseness, speed, and adaptability. One of the most commonly used types of bits is the high-speed steel (HSS) kind because of their durability and effectiveness in cutting through metals, wood, and plastics. The people in the industry who are working with masonry or concrete tend to choose carbide-tipped drill bits for their exceptional hardness as well as heat resistance. Cobalt drill bits are directly involved in the process of drilling hard metals particularly in the case of stainless steel. These types of bits can withstand high temperatures without losing their sharpness. Furthermore, spade bits and hole saws add to this variety as they are suitable for cutting through wood or drywall in a more extensive or deeper way. The selection of a suitable bit set based on the professional’s material or task, will lead to the material-specific and task-specific maximum performing set, and in the end, this results in better quality and faster work process efficiencies.
Techniques for Precise Drilling with Pilot Bits
Instructions to Safely Use a Pilot Drill
1. Select the Right Pilot Bit
Always start by choosing a pilot bit that fits the material you are planning to use, whether it is wood, metal, or plastic. Additionally, make sure that it is just the right size for the screw or bolt you are going to be using as this may contribute to the arrival of an absolute opening without harming the material.
2. Identify the Drilling Spot
Highlight the exact location with a pencil, marker, or awl to show where the hole should be drilled. This action will take away from any inaccuracy and the bit going off course while you are drilling.
3. Fasten the Workpiece
Definite placement of a loose workpiece is to be done using clamps or a vice so that there is no movement when you drill. In drilling, stability is very important for safety and precision.
4. Insert the Bit Properly
The drill should be standing straight and the bit resting straight on the material. If the latter is not ensured, there can be a risk of drilling at the wrong angle and the hole not of the required depth.
5. Drill Slowly But Steadily
You should start the drilling at a low speed to let the pilot tip bite into the material and hold it. Increase the speed little by little while still putting the same amount of pressure, which will make a clean and precise hole.
6. Check the Depth
If the required depth is specified, you may either use a depth control mechanism or cautiously keep an eye on the drilling up to the point the hole is right. This is a good way to avoid drilling too deep and to secure precision.
7. Clean out the boring
Bring the bit back a few times while drilling in order to get rid of the waste material, especially if you are drilling into woods. A clean hole is more efficient and less prone to overheating.
By following these procedures, a pilot drill is used safely and very accurately, therefore an indispensable step-by-step for professionals and home workers alike.
Hold the Right Position for Perfect Holes
To reach perfect centering while drilling holes, it is necessary to have a good set of tools and be very delicate. The very first thing one needs to do is to use a center punch or awl to mark the drilling area’s center precisely. This will produce a small dent that will be of much help in the guidance of the drill bit and will reduce the possibility of the bit slipping. If one needs an even higher level of accuracy, one should either use a drill press or a guide jig, as the jig is placed over the workpiece to provide a drill bit the right angle. Thus until now one has been dealing with less than perfect surfaces, the advice is to go in for self-centering drill bits that are specifically made to line up with the drilling surface without needing any manual processing. Regularly checking the alignment during the process of drilling will mean accuracy and will minimize mistakes. The use of these techniques will result in the production of well-centered holes that are precise in any job, thus fostering the achievement of perfection in the drilling operation to all levels of expertise
Friction and Its Impact on Drilling Performance
The role of friction in the performance of drilling is very significant because it directly influences the cessation and quality of the process. The heat producing while cutting also causes the creation of friction so there are many negative things that can appear because of the friction-related heat such as the tool wearing, the material getting distorted and the precision being reduced. On the other hand, really high levels of friction can cause not only the drill bit to become blunt pretty fast but also turning the whole process of drilling into hard work and at the same time leading to decreasing accuracy time after time. Therefore, the use of correct lubricants such as cutting oil is indispensable to deal with the problem of friction in an effective manner. The lubricant also helps in getting rid of the heat, lessening the wear off of the drill bit, and thus resulting in the neater cut. Moreover, the quality of the drill bit material like carbide or high-speed steel can have a great impact on the heat resistance and performance of the drill and so the selection of the bit should be done accordingly. The control of the speed and feed has been played another major role so the selection should be based on the efficiency of the process and the easiness of the process without the heating. The professional can extend the lifetime and increase the accuracy of the drilling machine just changing the way of the drilling machine to run.
Applications of Pilot Bits in Woodworking and Metalworking
Using Pilot Bits for Holes for Screws in Wood
Using pilot bits to create holes for screws in wood is best achieved through great precision to fashion a strong, reliable tie. A pilot hole is the responsible one for leading the screw and thus reducing the danger of splitting the wood, especially in the delicate or thinnest material. To get the best results, the pilot bit should be slightly smaller in diameter than the screw’s minor diameter so that the screw threads can grip the wood securely. Different drill depths—based on screw length—do not only prevent overtightening but also enable a flush or recessed finish as required. Whether the wood is soft or hard, using pilot bits that are the fittest for the project will guarantee a neater and more professionally done job.
Pilot Bits in Metalworking: Best Practices
When it comes to using pilot bits in metalworking, the most important things to consider are precision and material properties that provide optimal results. First of all, the selection of a pilot bit made of high-speed steel (HSS), cobalt, or carbide will ensure the toughness necessary for the metals like stainless steel and aluminum to be cut through. It is essential to choose the pilot bit size that matches the main drill bit so as to create a correct guide hole that will not wander nor lose its accuracy. Besides, the use of cutting fluid or lubricant eliminates the problem of heat formation and contributes to the longer operational time of both the pilot and the main drill bits. The drill speed should be kept at the proper level which is set according to the metal’s type and thickness in order to prevent overheating and ensure a more even drill finish. Not only does the right application of pilot bits in metalworking raise the efficacy of the operations but also promotes the life cycle of the tools and elevates the professional level of the outcomes delivered.
Self-Centering Drills vs. Standard Pilot Bits
Here you will find the answer to your inquiry regarding the differences between self-centering drills and standard pilot bits and how this knowledge can be employed to make a tool selection that is required for a specific job. Self-centering drills are designed with a spring-loaded mechanism that automatically guides the bit to the center of a mark or indentation, ensuring accuracy without the need for additional markings. They are particularly useful for tasks such as hinge installations, where precise alignment is critical. By contrast, standard pilot bits are uncomplicated tools that need a pre-marked guide or manual centering to ensure proper positioning. They may not have the centering function that is automatic but they, on the other hand, this very feature makes them good as every bit and used for a large variety of applications, as in drilling through thicker materials, or when the job involves tough surfaces. Often, the choice of one over the other depends on the project’s nature and the level of precision desired, with self-centering drills outstripping the competition as far as being the most convenient to use and the most precise, besides being the options which can reduce robustness and adaptability to the conditions the most.
Maintenance and Care for Pilot Bits
Best Practices for Storing Pilot Bits
I’m convinced that the treatment and protection of the pilot bits will be the most important aspect of preserving their quality and their duration of life. One of the best ways is to be in possession of a sturdy and orderly case specially designed for drill bits of various sizes. It does not only prevent bits from losing but also makes sure that they will be safe from a breakage that may happen accidentally. I, as a rule, always remove any dirt, dust, or moisture from the bits before keeping them, as the remaining matter can cause corrosion or dullness in the long run.
Temperature and humidity control are also significant factors for proper storage. I have been storing pilot bits in a cool and dry place distant from extreme temperatures, and I haven’t had any issues with corrosion or degradation of the material. I would not recommend storing in places with high humidity because moisture is the first among the causes of rust and applying machine oil slightly to the bits before storing can be an extra barrios against corrosion as well.
Lastly, I want to say that I occasionally check out my drill bits, even while they are in storage. This practice helps me see any signs of wear, damage, or rust in the early stages and take care of them quickly. I have found that by doing this, I have been able to keep my pilot bits performing well and lasting for a long time, and thus they are always ready for me to use.
How to Sharpen Pilot Drill Bits Effectively
Sharpening pilot drill bits is an essential skill that ensures optimal performance and prolongs their lifespan. To sharpen effectively, you will need a bench grinder or a dedicated bit sharpener. Begin by securing the drill bit firmly and inspecting its cutting edges for wear or damage. The goal is to restore the sharpness while maintaining the correct angle, typically around 118 degrees for standard bits. Gently press the bit against the grinding wheel, rotating it evenly to preserve symmetry on both edges. Take care not to overheat the bit as this can weaken the material; cooling it intermittently in water can help. For precise results, consider using a sharpening guide, especially if you are new to this task. Properly sharpened bits not only cut more efficiently but also reduce the risk of breakage, making them an invaluable tool for any task.
⚠️ Signs That Indicate a Pilot Bit Needs Replacement
A pilot bit that needs changing is most easily recognizable if it shows clear damage such as rounding or chipping on the cutting edge. The bit starts to lose its sharpness at the tip, which in turn leads to harder material penetration and hence slower drilling with less precision. Moreover, the tool might produce too much heat or smoke when in use, even if drilling is done properly, which is normally a hint of a dulled cutting edge. These are the main parts causing the tool to be less efficient and at the same time, latex can be extended to produce more tools and tools permanently and the drill itself can be damaged and its work surface will be at risk.
Moreover, you can find that as soon as the bit shows any indications of wobbling or misaligning, it may have some of its parts damaged or bent, such as the shaft or the tip. The pilot bit should be a rotatable part which rotates smoothly and quietly if it performs ideally. Drill holes having irregular shapes or differing sizes, although the technique followed was being very careful, the life of the bit has become dissapointedly short through the last months. Also, if the bit had been so dulled and worn out that the drilling process was much more labour, time and material consuming, it was about time to evaluate the bit’s condition.
Of course, it is possible not to forget to remember that the performance might be related to the material itself, the pilot might not work well on some unusually tough material like metal, and furthermore it will be the driver for further wearing of the bit which can be more rapid on these latter materials. In such cases, if a bit no longer cuts the material for which it is designed even after all possible measures of maintenance and use, it is better to replace it and assure that the quality and the time of the projects’ execution will be maintained. Being aware of these signs, and checking them during maintenance is another way to keep your tools, equipment, and most importantly, yourself safe and avoid accidents.
Reference Sources
Introduction to Drilling Technology
This source provides an overview of various drilling tools, including pilot bits, and their applications.
Drills and Accessories – Building Maintenance
A detailed guide on drills and their accessories, discussing their functions and uses in different contexts.
An Analysis of the Relationship between Orthopedic Drill and Pilot Hole
This study examines the use of pilot holes and drill bits in orthopedic practices, offering insights into precision and alignment.
Frequently Asked Questions (FAQs)
❓ What are pilot drill bits and what is their purpose?
A pilot drill bit forms a pilot hole first, which acts like a guide for a bigger drill and protects against the drill wandering around; hence, it also increases the possibility of a true perpendicular final hole. A pilot pointed drill bit can be a good choice for the beginner to eliminate the possibility of slipping the drill bit in metal and wood due to file finishing process and at the same time, to place the drill right for the final size. The use of pilot holes is a must in all cases where the use of a drill bit without them would present a risk of splitting or breakage in the case of larger sizes or very thin materials. The pilot-hole drill bit combined with a center punch or a center drill is a very good way to painlessly start a hole in a punched or existing hole. Such an approach relieves the cutting edge from stress and lets the material cut out more cleanly when you advance to a larger drill bit or a step drill bit.
❓ How do pilot bits in drilling help with precise drilling and preventing wander?
Pilot bits improve drilling accuracy by acting as a guide for the larger drill bit, which prevents slipping and keeps the tip centered. By using a machinist-style center drill or a small pilot hole, the chisel will less frequently have to chip in to scrape the top of the bigger drill, and the heat that could spoil the twist drill bit will be less. Moreover, a pilot aids to avoid such possible issues as splitting and breakage while drilling large holes or working on hard materials like stainless steel. For satisfactory results, it is suggested to apply a center punch before the pilot to prepare a hole that assists the pilot point in fitting tightly. It is a usual practice to do this when the pilot hole is followed by the final hole and, at the same time, it can make countersinking cleaner.
❓ Can I use pilot drill bits for screw holes and what diameter pilot hole is required?
The pilot bits that should be used for screws have to be of the screw thread of the material that the screw is being made of; while making a small pilot hole, the purpose is the same, the screw threads will be allowed to bite without the need of too much force or stripping. The selection of the correct diameter of the pilot hole is very important for hardwood and metals: the hole should not be very small because it is the reason for the splitting or breakage, while the hole should not be very large because the thread may not hold very well. One of the most traditional ways is the use of twist drill bits so that they are of the minor diameter of the screw or there are screw charts that are useful in finding the hole sizes suggested. Drilling into aluminum or stainless steel requires an appropriate pilot hole and in some cases, a countersink will help in preventing deformation and in making the final hole countersunk to a flush head. Hex shank driver used with a self-centering drill or an adjustable bit set can make pilot drilling and screw seating easier.
❓ Is it a good idea for me to use a pilot bit along with a drill press machine, and what impact will it have on the final hole?
The use of a pilot bit with a drill press improves accuracy as the press makes the drill remain vertical and stable through the entire operation of both pilot and final drilling. By creating a pilot hole, the tip on the bigger drill will have the right shape to cut the material properly hence reducing the risk of the final hole ending up too big or material slipping, which are some of the drawbacks of using hand drills. In addition to providing the hole opening, drill presses also help with the issue of drilling variable-speed in various materials like sheet metal or wood and also in such a way that there is no scuffing and cutting edge wear. When a hole is large, it is recommended to begin with a pilot hole and then with a reamer or step drill one can have very smooth holes and exact diameters. It is always good to have small drill holes for the clamping and where to locate the center drill or center punch before the pilot hole that will then contribute to the good end product.
❓ Which pilot bit types are most suitable for metal applications such as stainless steel and aluminum?
Splitting points or bits with a sharper pilot point decrease walking as well as increase cutting efficiency in the cases of metals, such as stainless steel and aluminum. If the bit has a geometry that supports proper heat distribution, then the lifespan of the cutting edge is also increased, and this is particularly essential for hard metals. In most cases of metalworking, the cleanest hole is the result of a step-wise approach: pilot drill bit, then larger twist drill bits, and lastly a reamer or a step drill. Selecting cobalt or titanium-coated bits might also be a good decision when drilling stainless steel, and using a center punch can be beneficial for setting the initial pilot hole. Galling is prevented through the manipulation of speed and the use of cutting oil, and the removal of chips from the flute is also promoted this way.
❓ In what way do pilot bits and countersinks complement each other in the process of preparing holes for screws or bolts?
Whenever preparing for screws helpings, drill a hole first to the size of the minor diameter of the screw that is just correct, then use a countersink to create a chamfer for a flush head or to seat a bolt head cleanly. Before the larger countersink is allowed to help, the pilot acts as the center to counter it, thus reducing the likelihood of chatter and an uneven chamfer which can hurt the distribution of the load around the thread. For sheet metal or thin materials, the use of a pilot together with a punch or center drill before countersinking will not only prevent deformation but also result in the absence of a punched hole that might, after all, be too large for the countersink to work on. the right arbor, and counter sink geometry reduces splitting and ensures that the hole could eventually accept the final fastener without binding. In the case of multiple sizes, it may be worth considering a bit set that includes the pilot drills and the matching countersinks for consistent results.
❓ Under what circumstances should you go without a pilot hole and directly drill a hole with a larger drill?
Drilling through the material without making a hole beforehand can be an option if there is a good split point large drill that is used or the material is of low hardness and low risk of wandering is anticipated, but this raises the chances of slipping and chiselling of the drill point if the hole is large. Pilot drilling, on the other hand, is a must for large drills since it allows to distribute the weight and in addition it decreases the risk of breaking the drill, so do not miss it when cutting brittle materials or thin metal sheets which might tear the hole without a pilot. If you had to go without a pilot, use center punch, grip the chuck steadily, and go at an extremely slow speed while being ready to remove the material gradually so the slip will not occur. Sometimes professionals use step drills and reamers at the final stage for control of the hole size rather than depending only on a single large drill. Whatever the case may be, balancing the speed, feed, and lubrication will not only reduce blade wear but also maintain hole diameter accuracy.