Tool maintenance is a crucial task if you want your tools to always perform at their peak, especially when it comes to power tools from Harbor Freight under the Drill Master brand. Whether you are a professional carpenter or someone who loves making things, having your tools work efficiently and precisely can make all the difference in the quality of your work. In this article, we will look closely at the easy-to-follow steps you can take to maintain your tools with the help of original Drill Master parts, which, in turn, helps you become more environmentally friendly and energy-efficient, and get rid of the need for buying new parts, which can be very expensive. By recognizing the wear points many users tend to overlook and sticking to preventive care routines, you can easily get up to speed on maintaining your friendly-to-machines tools. Let’s put our tools in order and get into it.
Understanding Drill Master Tools and Their Importance
What is it that makes Drill Master Tools exceptional?
Drill Master tools are definitely the market favorites; they are considered to be always there for the two user categories – the DIY fans and the professionals. Their selling point is their versatility, being able to take on projects of a vast scale, from easy –detailed work to heavy-duty labor. When it comes to pricing, the very first feature to notice about the manufacturer is that affordability is their focus, and they make their user not to meet any quality standards while buying at prices that are very budget-friendly. An example is the user-friendliness of the tools: the design is ergonomic, the construction is not only durable but also ensures your comfort is not compromised, and the mechanisms are easy to handle via technology. Apart from all these, the tools are compatible with a broad range of attachments and parts, indicating that not only can they do a lot of things, but they can also be used in many different ways. Whether it is home repairs or major construction projects that you are working on, Drill Master tools merge so well their performance and value that the result generated is always reliable.
Precision and Power Tools
Precision is a fundamental characteristic of the contemporary power tools domain and is linked to the efficacy, safety, and quality of the results. The premium tools of today come with the latest technical features, such as laser guides, digital calibration, and micro-adjustments, that allow for completely accurate execution even on the most delicate tasks. Moreover, the improved materials and manufacturing methods have enabled the achievement of the strictest tolerances, thereby reducing the likelihood of mistakes during the most crucial operations as well.
Precision not only improves the quality of the work but also helps save materials and reduce redo work, providing the benefits of both eco-friendliness and cost-effectiveness. It is very much needed in the fields of cabinetry, machining, and professional construction, as small measurement errors can lead to later product failure. Additionally, machines with user-friendly controls and error-avoidance devices will greatly help both pros and amateurs achieve a very high standard in their work every time. Being ahead of new precision tools means they will not just meet today’s users’ expectations but exceed them.
Benefits of Using OEM Replacement Parts
By using OEM replacement parts from the manufacturer, you will enjoy the highest possible quality, combined with the best performance in any industry. The same parts are engineered to be exact copies of the original product, so they fit perfectly and work with 100% efficiency. Counterfeit parts do not have the same quality as OEM parts. Each part of the product should be made with the same materials and technologies as the original. Finally, this high level of accuracy directly leads to the elimination of all potential problems and their resolution, thus preventing the product from going dead earlier.
Moreover, manufacturers who provide parts as alternatives usually offer warranties, ensuring that the parts are as durable and reliable as possible. This can be the way to huge money-saving after some time, because the top-notch very rarely need servicing. The reliability of this welcome feature in heavy machinery-based sectors like auto, HVAC, and manufacturing is the primary factor that keeps their businesses’ operations free from costly downtime. The performances of the products are safeguarded, and any threat that might be caused by the latter substandard replacements is minimized when the users and the end-users insist on OEM components.
Essential Drill Master Parts for Tool Maintenance

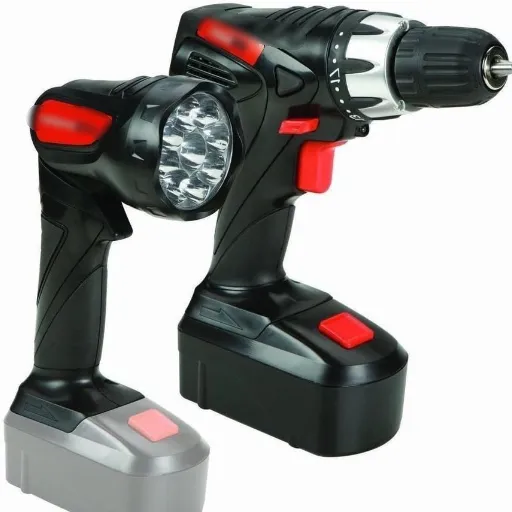
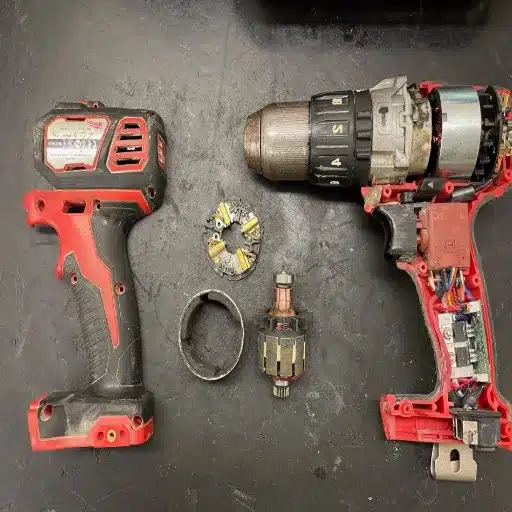
Key Components of a Cordless Drill
A cordless drill is a necessity for a versatile, convenient, and robust hand tool. The battery pack is the element that sorts it out and it does so very well:
Battery Pack: The battery pack is the central element of the cordless drill, making it a straightforward, portable tool compared to electric models. Lithium-ion technology is the most popular, offering long lifespans, fast charging, and lightweight products. Often, the better models also offer higher-voltage options like 18V or 20V, which provide more torque and allow drilling harder materials.
Motor: Electric Motors are primarily present in most power tools; these motors usually convert electrical energy into mechanical force. But the motor of a drill consumes energy and generates heat, so the motor design factor is crucial. In a cordless drill, power is provided by the battery, and there is no motor-stator energy transfer, which plays a vital role in efficiency and battery life warranties.
Chuck: The chuck is a fixture keeping in place drill bits or accessories. Keyless chucks are very popular because of their simplicity, which allows customers to change bits without tools in the quickest possible way. The standard sizes are 3/8 and 1/2, which are convenient for bit sizes.
Gearbox and Speed Control: The gearbox is the part of the drill that sets the rotation speed and the torque. A drill with several speed settings is much more flexible for users, since they can easily switch from high speed for drilling to low speed for driving screws into tougher materials. Also, the torque adjustment allows reducing torque when turning a small screw under a fragile surface material to avoid an unbearable noise, thereby extending the life of the screw, etc.
Clutch: The introduction of the clutch to the system adds another layer of control, namely, disconnecting the drill’s drivetrain when the stalling point is about to be reached. This not only helps reduce and eliminate the risk of cracking or breaking screws or the material being fastened, but also promotes safety. In this way, it becomes a feature worth having for controlled and delicate operations.
Trigger and Handle: The trigger on the drill controls its speed. Thus, the drill can run at variable speeds to meet the user’s needs. The handles, which are explicitly designed to fit the user’s hand, are often made of rubber-like material, providing a non-slip finish, control and comfort, and helping keep fatigue to a minimum.
LED Light: It is not common knowledge; however, many cordless drills now have LED lights built in to increase the brightness of the work area. This feature is especially advantageous in poorly lit or very tight areas, making it a necessity for safety and precision.
The mentioned parts can also help prolong a tool’s life if it is regularly and properly maintained; in addition, this will help select the proper drill for each job. Simple steps such as keeping the chuck free of dirt and dust and ensuring the battery is in peak condition can go a long way toward extending the life and enhancing the performance of your cordless drill.
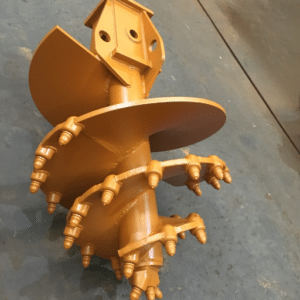
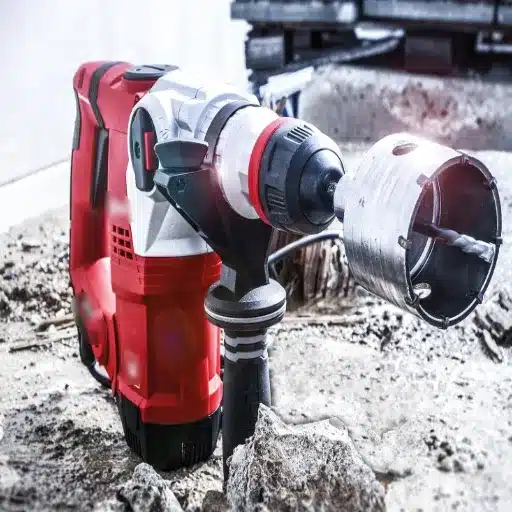
Understanding the Functionality of Angle Grinders
An angle grinder is a versatile power tool that can cut, grind, polish, and finish a wide variety of materials around your home and garden. By the help of the cutter disc that spins at a fast pace, these machines can perform a significant number of functions, so they are very handy in both construction, metalworking, and home renovation projects. The four main parts of an angle grinder are the motor, the gearhead, the abrasive disc, and a shield that keeps the user safe.
With the help of exchangeable discs and attachments, angle grinders are among the most versatile tools available, suitable for a wide range of applications—from cutting metal pipes to removing rust, smoothing surfaces, or even sharpening blades. However, to use an angle grinder effectively, you need to give it regular care, such as checking whether the grinding discs are worn out, ensuring the tool is clean by removing any obstructions from its air vents, and keeping it aligned at all times. Apart from that, the choice of the disc’s material—be it metal, stone, or ceramic—can significantly improve process speed and the quality of the results. These features of angle grinders make them a fundamental part of the job site, even though the tool accounts for only 8 cents of the cost of the MILWAUKEE power drill, cordless battery bank, pry bar, etc. Their status further demonstrates angle grinders’ efficiency and practicality as professional and DIY enthusiasts’ go-to tools for projects requiring precision and versatility alike.
Parts Replaced for Maximum Efficiency
It is necessary to use high-quality parts when replacing a component to achieve the best performance from your angle grinder. Such as discs, bearings, brushes, and switches that need to be checked and replaced. Worn-out carbon brushes reduce motor performance, while dull or damaged discs lead to lower cutting precision. The decision to buy durable, compatible parts, especially those tailored to the make and model of the grinder, not only extends the life of the tool but also reduces the safety risk of malfunction. Many brands are providing comprehensive data on replacement parts, making it easier for users to identify the correct part for their application. The key point here is that the proper use of reliable replacement parts, along with the appropriate maintenance measures, ensures the tool is ready to deliver consistent performance when it is needed most, such as during strenuous tasks.
How to Maintain Your Drill Master Tools
Cleaning and Maintaining Your Drill and Grinder
Regularly cleaning and maintaining your drill and grinder is crucial to ensure steady performance and extend the life of the tools. First off, always check the tools for any accumulation of dirt, dust, or other residues that may cause problems. After using them, use a high-quality brush or compressed air to remove dirt and dust from hard-to-reach areas, and give special attention to vents, gears, and moving parts. For more persistent grime, a damp cloth with a mild detergent can be the answer, while the electric parts should be carefully avoided.
One more major thing that laboriousness is critically essential in no less scope than care. It reduces friction, which in turn helps prevent wear on parts. Refer to the manual for the recommended kind of operation and lubricants to be used. Another thing that needs to be taken care of is the condition of cords, batteries, and connecting parts. Moreover, the tools should be put in a well-ventilated place and also a dry place. In this way, one will prevent rusting or even any casual damage. By doing the above, the tools you own will maintain their highest level of performance throughout their lifespan, no matter the range of tasks they are used for.
Changing Brushes and Other Attachments
In time, the electric drill and grinder’s brushings are slowly ground down as the tools get used. Wear on the brushes will then become the main cause of lower performance and efficiency issues. Be sure to check the brushes from time to time to spot any problems, such as fraying or not being the intended length. Replace them accordingly to the needed frequency of use so you could keep up the optimal motor function. Tools of the present age mostly have some kind of provision that helps the user to determine easily the time or thresholds for the all-necessary replacement of the different components. In addition to examining the brushes, be sure the other parts of the power-driven tools, such as grinding wheels, drill bits, and attachments, are in good condition. The tools’ performance will be hindered and safety risks may arise if accessories are not in good order. Furthermore, the overall quality of the service rendered will be compromised. It is good to invest in and use high-quality substitutes, as well as to follow the manufacturer’s recommendations, because this way your tools will operate efficiently and yield consistent results.
Battery Health Monitoring and Maintenance
It is necessary to prioritize the battery’s health to ensure the longevity and efficiency of the tools in the long run. Looking at the battery first is the best way to start, and be on the lookout for a few key things, such as cracks, swelling, and corrosion around the terminals. Even these minor flaws can be the very thing that is stopping the battery from giving the performance it is supposed to. Keeping batteries in a cool, dry place, away from direct sunlight and extreme temperatures, will have a combined detrimental effect on both their lifespan and operating performance.
It is essential to know from the start that following the manufacturer’s instructions, mainly by always using the right charger for your battery type, is the best way to keep your batteries happy. Overcharging or using chargers that are not meant for the battery could end up decreasing the battery’s capacity of even causing it to overheat. Also, the only way to maintain the battery’s performance over time, especially for today’s lithium-ion batteries, is to cycle it by charging and discharging regularly. Whether the battery is used in tools, cars, or other devices, cleaning the battery contacts with a soft cloth now and then will ensure good performance by providing a stable connection for optimal energy transfer.
The other practice to put in place is to constantly monitor the battery’s charge capacity, which will help you decide when to replace it. Getting high-quality batteries and following safe maintenance instructions will be the way to go to reduce downtime, maximize tool performance, and create a safer work environment.
DIY Maintenance Tips for Beginners
A Few Easy Steps to Change the Parts on Your Drill
If you want your drill to last longer and work better, you need to maintain it properly and replace its parts from time to time. The following simple steps will let you replace the parts of your drill in no time:
Gather all necessary tools: If you have not done so before, get all the essential tools that are needed for the job such as a screwdriver, standard pliers and any other specialty tools required by your drill model. It will be like when you were cooking and found out you didn’t have one of the ingredients you needed in the last minute. You will be frustrated. And, the drill will also not be repaired.
Turn off the Power Source: Unplug the power cord from the outlet for a corded drill, or remove the battery if it is a cordless drill, to avoid accidentally turning it on while you are working. The battery always comes with the screwdriver, especially if it’s a Cordless Drill.
Remove the Worn or Damaged Part: The most commonly replaced parts are the chuck, carbon brushes, or switches. For instance, to put in a new chuck, start by loosening the existing one completely by turning it counterclockwise, then carefully detach it with a wrench or a chuck key if you have one.
Installation of the new part: Administer an alignment operation similar to what is shown in the manual. If at all chuck is replaced, put it into the hole and then twist it to the right; and then, try its strength; it should be quite tight. As for the carbon brushes, insert them to the proper slots and then connect them as instructed.
Putting the Drill Back Together and Its Checking:After the new part has been installed, reassemble any covers or parts taken off and then plug in the power source. Just let the drill run at a slow pace to make sure that the new part is working, before going to full operation.
Preventive Maintenance after Replacing the Part:Soon after the hardware replacement is over, remember to do on a regular basis cleaning and lubrication of the drill, otherwise, you may face heavy wear and tear in the future. Stick to the manufacturer’s maintenance procedure to keep your drill running at its best.
In this way, even a novice can replace the drill’s parts with confidence, thereby extending its lifespan and ensuring reliable performance for DIY project applications.
Using Variable Speed Controls for Better Performance
Variable-speed controls enable drill performance to be optimized for a wide variety of materials and jobs. For instance, lower speed settings are the best for more delicate operations like drilling down to softwoods or plastics, as they are less likely to crack or to cause damage. Conversely, higher speeds provide the energy required for more difficult jobs, such as drilling into metals or bricks, and they promise fast, accurate work.
Users can better clean the results and make their drill bits last longer by matching the speed to the material. The majority of contemporary drills are equipped with adjustments via an easy-to-use dial or control that responds to trigger sensitivity. To achieve the best performance, read the speed capability and setting recommendations for the specific application in the drill’s manual. Having progressive speed control as your companion in your workflow ensures professional-quality output across all your personal and professional projects.
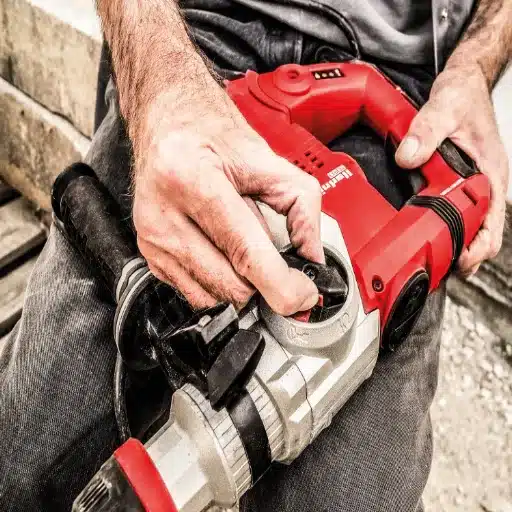
Safety Tips When Working with Power Tools
When using electrical tools, it is essential to be very cautious about one’s safety to avoid accidents and ensure smooth operation. It is very imperative to have the suitable personal protective equipment (PPE) beforehand, such as safety goggles, gloves, and ear protection, to save yourself from debris, loud noises, and harmful contact. A detailed check on tool damage is very significant before use, like the cords are frayed or some components are loose, and any faulty part should be repaired or replaced to prevent malfunctions. The surroundings should have good lighting and should be kept neat and at a distance from potential tripping hazards. Moreover, do not wear any baggy clothes or accessories that may be caught in the power tool.
It is very important to read the user manual for each tool to understand its limitations and proper handling techniques. One must also pick the right tool for the right Job – Overloading tools, or using them for unintended purposes, can be a threat to safety as well as performance. Moreover, it is essential to make sure that all blades, bits, and other attachments are securely fixed after which the power can be turned on. When tools are linked to a power source, be very watchful by making sure that the switches are in the ‘off’ position so no accidental start can take place. The same applies to connectors – sources – loads: never touch connectors by hands when power is on. Always take regular short breaks to prevent fatigue and maintain high concentration. Through these safety measures, one can create a safe working environment for the power tool operator and easily perform tasks on projects that require power tools.
Understanding Warranties and Support Options
Questions Before Buying Drill Master Tools
Drilling Master’s tools mostly have a warranty limited in time, which can be different from product to product, as well as the place where you buy them. Most warranties cover the imperfections in materials and workmanship for the period specified, typically 90 days to 1 year. At any rate, one should be very watchful to look through the warranty stipulations attached to the tool in order to know the covering and what the exclusions are. The usual exclusions which are not covered are: usual damage from using, abuse, changes made to the product, and carelessness causing damage.
If your Drill master tool needs service or replacement under warranty, always save the purchase proof, whether it be a receipt or an invoice, as it is usually necessary to fix a claim. Moreover, certain shopkeepers may also be giving the consumers, extended warranty choices, to whisper in the ear, assured peace of mind. It is common for the manufacturer or retailer to be the ones you can turn to for help, and most of them also have customer service hotlines or online support centers to make things go smoothly. It is a very good practice that you are already well informed about warranty details and support choices so you can relax about your money, and if it happens, handle problems quickly and effectively.
Replacement Parts Assistance Commission
My initial procedure for matching parts is to pinpoint the exact part and visit the manufacturer’s website to check it. Most usually provide product pages with high-level detail or downloadable user manuals, which include part numbers. The usage of these numbers for a direct search makes the whole thing easier and the result is a new part that is compatible with the old one. In addition, many companies provide a dedicated support area where one can find all the information about a spare part they are interested in, e.g., how to order and install it. The latter part may even be accompanied by video tutorials, which are very useful for installation.
If there are no results on the manufacturer’s website, the most effective alternative is to contact customer service first. More often than not, companies offer customer service hotlines, email support, or live chat on their websites. I have discovered that giving the product’s model number, purchase receipt (if available) and a good description of the issue can make this process go significantly faster. The customer service representatives are capable of confirming the availability of a part, suggesting equivalent options if the original one is not in stock, and giving instructions for ordering.
I also recommend other options to look for. Quite often, I look at third-party dealers or online auctions such as Amazon, eBay, or dedicated parts industry stores. It is very essential to check the reputation of the seller and to be certain that the part is authentic or officially approved for the product you are buying. That way, I meet my goal of getting the spare parts quickly, so the product is functional again with no or minimal interruption, by sticking to these steps.
How to Figure out Basic Problems
I always figure out the source of the problem when I run into issues with any product or device. The product’s manual or official support documentation is where I go at first. These vital resources may include troubleshooting steps for the most common issues. Should the answers not be found in the documentation, I turn to the Internet. I like to search for the same problems that people around the world report. The forums, the community boards, and the official support pages provide a real helping hand with their thorough advice and step-by-step instructions shared by those who faced similar issues.
If the issue is suspected to be software-related and the error history is known, I will check the most recent software update, then reset the device or wait for new updates. Software updates always fix bugs or compatibility issues that might be causing the problem. If the issue is related to hardware, the first thing to do is to check the device’s parts and connections with my naked eye to see if there are any signs of improper securing or wear. Sometimes, just cleaning or reconnecting a loose cable is enough for the device to start functioning as before.
In case the given steps mentioned before do not deliver the desired results, then we go straight to the customer support team for the product. Now there comes the step of calling the team. I make it a must to have all the details that need to be known available, like the model number, the problem, and the steps I have already followed. This will prevent loss of time, and the team will be able to give explanations quickly. It so happened that I was walked through advanced troubleshooting procedures or was told to send the device for repair or replacement during such times. And when it comes to being this categorical, I shall deal with the most common issues and thereby reduce interruptions.
Reference Sources
Critical Equipment, Facilities, and Maintenance Strategies for Effective Training
This paper discusses the importance of maintenance strategies and the role of parts in equipment upkeep. Read more here.
Aligning the Sheboygan Area School District’s Metals/Manufacturing Machine Tool Curriculum
This document explores the integration of technologies like CAD and CNC in tool maintenance and manufacturing. Access it here.
Investigation of Laser Drilling Variation and Knowledge Management Framework
This study examines equipment details and maintenance considerations for laser drilling machines. Check it out here.
Frequently Asked Questions (FAQs)
Drill Master 4 is an extraordinary chameleon of the drill; what are the available replacement components?
When your Drill Master 4 cordless drill needs a part replaced, the following list of parts is usually available: motors, chucks, gears, brushes, batteries, and battery chargers. Very often, you can purchase original equipment manufacturer (OEM) parts for the high power and precision they provide, which help maintain the tool’s original output and torque. Thus, when you are replacing parts, don’t forget that lithium-ion batteries are available for extended run times and are much lighter, and that you should also confirm compatibility with different models of cordless drills. Keep the drill master in good shape by changing worn cozmonauts or chucks before they ruin the internal gears. To be on the safe side and ensure proper variable-speed settings, if you are not really sure, get the manual or ask a technician.
Which battery charger and lithium-ion battery should I pick for a 20V cordless drill?
Battery charger selection depends on voltage and chemistry. To ensure proper charging and battery efficiency, it is important to select a charger with a 20V rating as well as lithium-ion chemistry that are the same as the cordless unit’s. The fastest chargers are those with features such as temperature control and a range of charging speeds. Using a good battery charger increases battery life and it is also essential in preventing overcharging which may lead to power and torque loss. Using the charger specified by the tool’s manufacturer, or an OEM-compatible part, keeps your drill ready for work in no time. Consider battery designs that are comfortable to use and that give the tool a convenient, ergonomic feel for long, challenging projects.
Is it possible to use parts from Drill Master on other Harbor Freight-branded power tools or grinders?
Some Drill Master parts are cross-compatible once we have them in other Harbor Freight power tools, but compatibility is not a common feature of models and components, so always make sure the specifications are checked before the parts are installed. Chucks, switches, or batteries can be helpful in several drills or even some angle grinders, gears and armatures are a different story, they are mostly only used with one particular model. For safety and warranty reasons, and to ensure proper torque and output performance, it is better to use only OEM parts or verified replacements. When modifying the parts, make sure you keep the drill master’s original safety features intact, and check the electrical connections to see that they are compatible even to the cord or to the charger. If you are unsure, contact Harbor Freight support or check the tool’s schematic for advice.
What are the best accessories for a cordless drill suitable for DIY projects and adjustable applications?
A cordless drill can be considered incomplete without various drill bits, screwdriver bit sets, hole saws, right-angle adapters, and adjustable depth stops, which all contribute to the DIY tools versatility. Accessories that would match the adjustable output and torque settings of the variable speed reversible drills are beneficial and essentially keep bit slippage and workpiece damage at bay. Put the accessories on a one-to-one basis with the drill and see how they blend in. Remember to verify the drill can handle such an accessory with its RPM range. If the accessory is not compatible with the drill’s RPM range, it should be avoided or left out for safety reasons. The adaptors for orbital hand sander attachments and trim router bits are included, but it is important to check whether the drill’s RPM range is compatible with the accessories. To keep the cordless drill in control, the endurance of the accessory should be considered; a comfortable grip or a leverage attachment that reduces strain would be the way to go. Always use the accessories rated for cordless drill and the particular same chuck size of your drill master model.
How are the warranty terms for Drill Master tools, especially regarding parts such as the cord, lever, and fixed-base router attachments?
Drill Master warranty usually covers material and workmanship problems, but the warranty for parts like cables, buttons, or switches might vary depending on the product and retailer you deal with. Accessories such as fixed-base router attachments could be covered by use terms or come with their own warranties. To st ake a claim at Drill Master 4 warranty, and the like, keep your receipt and if necessary, product registration, and communicate the defect clearly when contacting their customer service. Their typical warranty will not include the wear and tear so maintain your power tool well so the probability of its failure prematurely will be lessened. Seek a vendor’s counsel regarding the availability of original equipment manufacturer (OEM) replacement and whether the repair work will leave the machine’s warranty in place.